For a while now I’ve suffered through painfully slow transfer speeds to and from my FreeNAS server. As low as 100MB/s read (I know it’s Gigabit but it’s still slow to transfer 100+ GBs of ISO’s), and 30MB/s writes.
A few weeks ago, I decided to take the plunge into 10Gb networking, in hopes of making my frequent file transfers to and from my NAS more bearable. If you’re also thinking about a 10Gb connection, this post is for you. Now I didn’t drop thousands of dollars trying to completely renovate my entire home network. For my use case, that would have been completely unnecessary. All I wanted was a super fast connection between my FreeNAS server, and my daily driver Linux desktop. I’m going to share the resources I used before and during my 10Gb installation in hopes of helping other do the same.
Prerequisite
Here are two excellent videos that helped me understand the requirements of a 10Gb network:
- A three part series that explains the core concepts very well
- Less conceptual, more practical walkthrough
My Hardware
Server:
FreeNAS-11.2-RELEASE-U1
Dell PowerEdge R710
Two Intel Xeon X5670’s
16GB DDR3 Server RAM
Five 2TB WD Green 7200k HDD’s
One 240GB ADATA Ultimate SSD
Desktop:
Pop!_OS 18.10 / Windows 10 (Dual Boot)
Gigabyte Z170XP-SLI-CF
16GB DDR4 RAM
Intel i5-6600K
AMD Radeon RX580
One Samsung 960 Evo M.2 NVMe SSD
One Mushkin M.2 NVMe SSD
Two SanDisk SATA SSD’s
One 2TB WD Green 7200k HDD
Preparation
I scoured Ebay looking for good deals on 10Gb NICs that fit my requirements:
-
Firstly, I wanted a dual port NIC. Even though at the moment, I only really need 10Gb speeds between my NAS and desktop, I would like to eventually spring for a 10Gb capable switch, and additional NICs for my internet connection, and Xen server. Having two ports on each NIC gives me that flexibility.
-
Second, I wanted SFP+ ports. Although there are 10Gb network cards with RJ45 ports, and I could have easily used the CAT-6 cables I already have to connect them without going through the trouble of switching to a foreign standard, they tend to be much more expensive that their SFP counterparts. Also, SFP+ ports have flexibility. If I so desire, I could eventually get fiber or RJ45 transceivers that fit into the SFP+ slots. But in the mean time, I could get a relatively cheap 3m SFP+ Direct Attach Cable (DAC) to bridge the gap between my desk and server rack with length to spare. IMPORTANT! Don’t confuse SFP+ with regular SFP ports. SFP is an older standard that only supports 1Gb speeds. To achieve the desired 10Gb network speed, you’ll need SFP plus. Many Ebay listings are unclear about this distinction, and even worse, some model names themselves (including the one I eventually purchased) say SFP, not SFP+. So to ensure the card you’re looking at has the correct 10Gb port, I recommend doing a quick Google search for the OEM’s product datasheet and verifying that it does indeed have SFP+ ports, and supports 10Gb speeds.
-
And finally, I wanted it to be as cheap as possible
Network Hardware
Of course, the well known and reliable Intel network interface cards were a bit too pricey for me, even on Ebay. I’ve seen a number of videos on budget 10Gb networks use and recommend the Mellanox brand of NICs. At the time of my purchase however, I couldn’t find any reasonably priced cards of that variety. I did, however find a number of HP brand NICs on the cheap. I did what I could to verify compatibility of these HP interface cards with my hardware, but there was very little in the way of information about these cards even for enterprise gear, let alone for home use. I decided to give them a shot and found a good deal for a Set of Two HP NC523SFP 10Gb PCIe Dual Port Server Adapters for $28.99. I found plenty of 3m SFP+ cables for $10 or less, but for fear of incompatibility, I opted for a slightly more expensive HP 487655-B21 SFP+ 10Gb Direct Attach Cable 3m for $19.95 (which you’ll see is on the official HP hardware compatibility list in the links below). All in all, about 50 bucks for a 10Gb connection, with the option to easily expand in the future.
NIC: Two HP NC523SFP 10Gb PCIe Dual Port Server Adapters
Cable: 3m HP 487655-B21 SFP+ Direct Attach Cable I’m not recommending you buy the cable at this link, this is just to show you the specs since I couldn’t find an official HP datasheet
Drivers
When I received my hardware, I still held on to the hope - despite hearing otherwise - that they would be plug-and-play. GUESS WHAT? They weren’t… it required some tinkering to get them functional, but functional they now are!
-
FreeNAS Drivers:
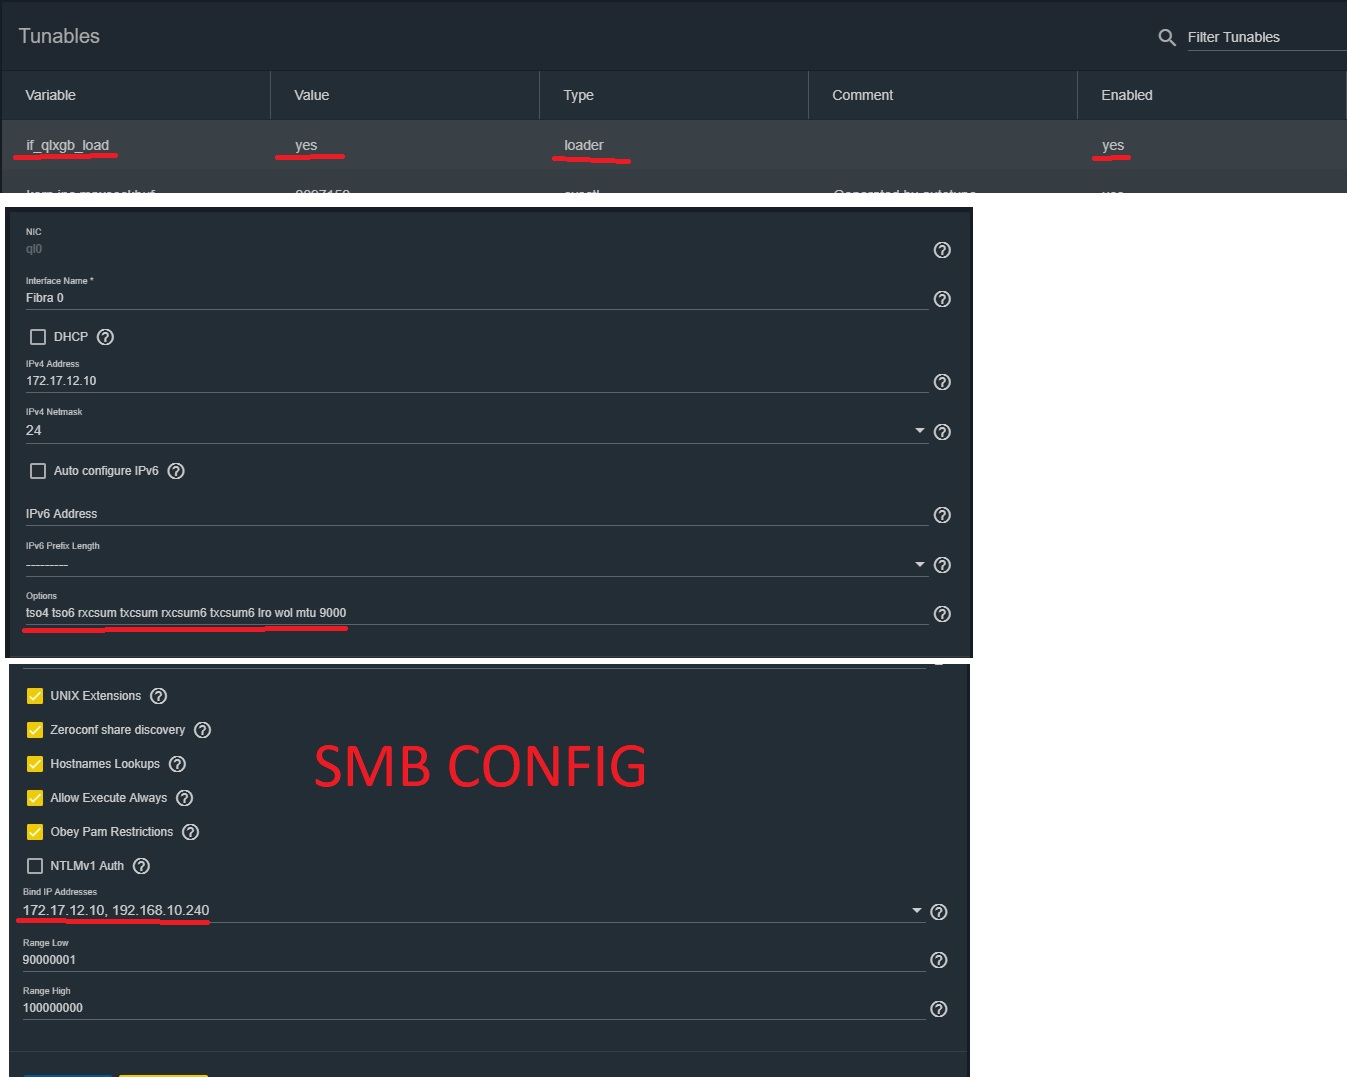
This particular HP card, is in fact a re-brand of the QLogic cLOM8214 Chipset. Luckily FreeBSD (the base of FreeNAS) supports this chipset through the qlxgb driver. The only modifications I made were to add
Variable: if_qlxgb_load
Value: YES
under System->Tunables, AND to manually set the MTU of both interfaces (since I had dual port NICs) to 9000. This can either be done by adding the optionmtu 9000to the network interface options through the GUI, or via the command line withifconfig <interface> mtu 9000. If you don’t perform this step, you’ll notice a barrage of hw_packet_error’s in the FreeNAS shell. -
Linux Drivers:
I Didn’t have to make any system modifications on Linux ( Linux FTW! ), however I did need to manually set the interface MTU to 9000 through the GUI or using the same
ifconfig <interface> mtu 9000command in the CLI. -
Windows Drivers:
Ironically, the biggest pain through this driver setup process came from Windows, the operating system that is usually the most plug-and-play of the bunch. I was able to find plenty of drivers through the official HP support website for Windows Server, but not for the home variety of Windows 10 ( yes I tried installing them anyways, the software performs an OS check during install and refuses to proceed on Windows 10 despite any compatibility settings I tried ). However, as I stated in the FreeNAS drivers section, this card is a re-brand of a QLogic chipset. So I had success using the QLogic Windows Server Drivers. You can’t simply run an executable, instead you must open the device driver update utility through Device Manager, and select the extracted driver folder by browsing your local files. After the wizard installs the driver, you should see “HP NC523SFP Dual Port Adapter” in the device manager instead of “Unknown Network Device” (NOTE: The dual port type that I have required I install the same driver separately for each of the two ports).
Network Setup
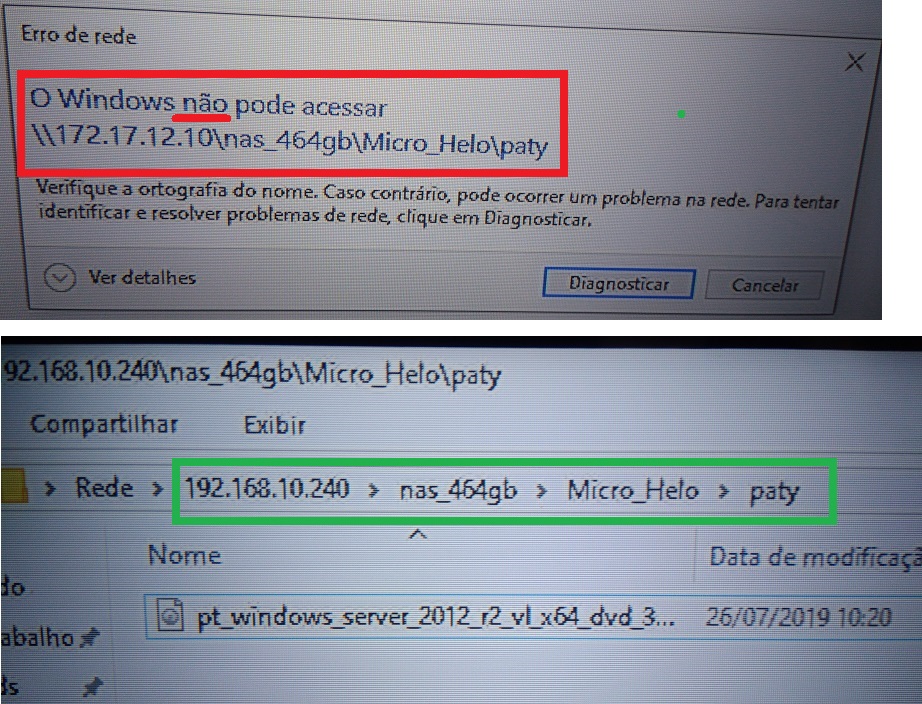
Since my use case was a direct connection between my desktop and FreeNAS server - a condition that meant bypassing my Cisco Gigabit Switch - I had to take the additional step of setting up a new subnet. This process is pretty simple, and if you’ve been able to follow the guide so far, it should be comparatively simple. On FreeNAS, add a new network interface. Select one of the ports from the new adapter ( due to the driver, this HP brand had a qlX naming scheme ) and set a static IP address in a different subnet from the rest of your network.
- FreeNAS:
IP: 172.17.12.1
Subnet Mask: 24 ( ie. 255.255.255.0 )
Options: tso4 tso6 rxcsum txcsum rxcsum6 txcsum6 lro wol mtu 9000 ( The only necessary option is mtu 9000 )
- Windows 10 and Linux:
IP: 172.17.12.10
Subnet Mask: 255.255.255.0
Gateway: 172.17.12.1
NOTE: There didn’t appear to be an option in the Windows 10 network adapter GUI to set MTU, so I used the following commands via CMD:
netsh interface ipv4 show subinterfaceto get the name of the relevant interfacenetsh interface ipv4 set subinterface "<interface name>" mtu=9000 store=persistentto set and save the value
Conclusion
And Bob’s your uncle! 10Gb network complete! Sort of..
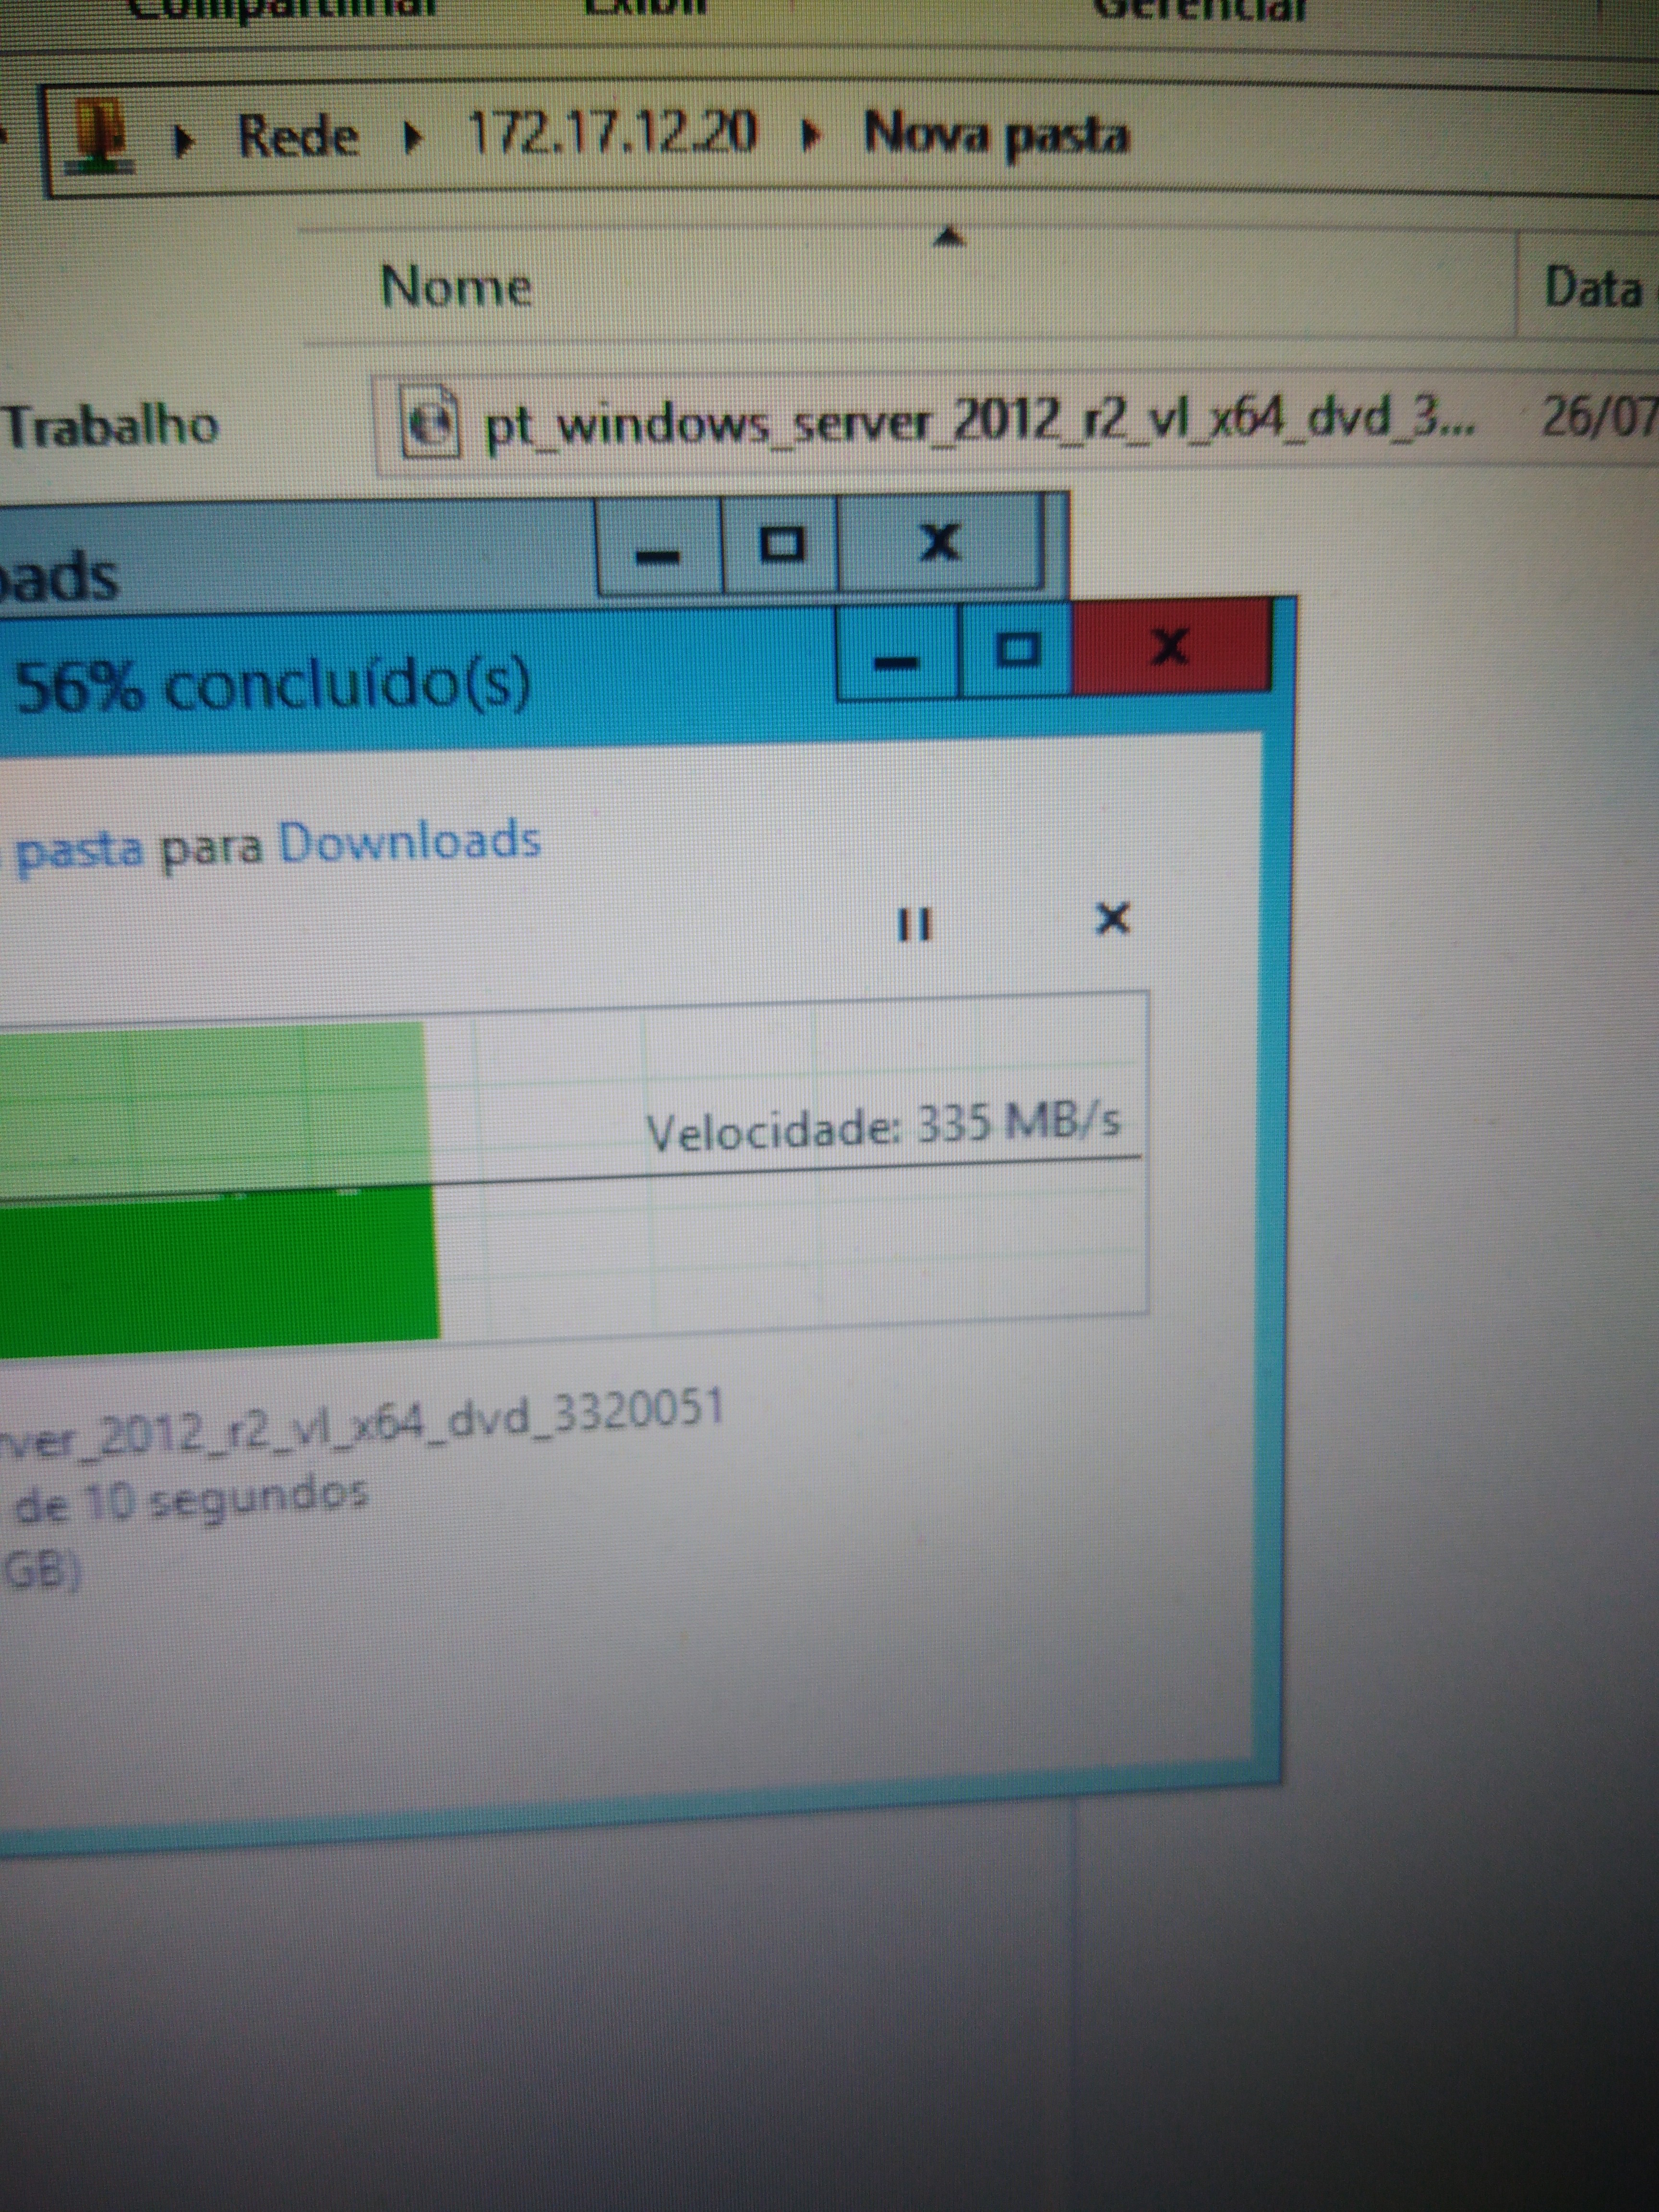
My adapters are being detected across all systems, and successfully communicating with each other - I’m now getting ~250MB/s (read) and ~250MB/s (write), a massive improvement over my previous situation to be sure. But there’s still room for improvement. Ideal 10Gb transfer speeds are around 1GB/s - 4 times greater than the speeds I’m seeing. It should be noted, that my quoted speeds are based upon my normal conditions. That means no RAM disks, and other simulated setups that some videos boast. My NAS consists of your average consumer HDD’s, and 1 SSD setup as a ZFS SLOG. With that hardware, I know I won’t ever achieve the ideal 1GB/s speed I mentioned. And if I never break the 300MB/s barrier with my current hardware, that’s okay. It’s plenty fast for my use case. Nonetheless, I’ll close with some thoughts I have to squeeze every last drop of performance out of my hardware.
Thoughts for additional testing:
- Force SMBv4 (FreeNAS is supposed to negotiate the most current SMB version, but it requires additional testing)
- Test transfer using other protocols (NFS, FTP, etc)
- Add an SSD cache to my FreeNAS pool
- Optimize FreeNAS / ZFS tunables
That about wraps up my guide. I hope this was helpful to those interested in setting up their 10Gb network, or for those who have had trouble with this particular brand of Network Interface Card.
Happy networking!