Getting ready to sell some laptops to help fund my pfSense network build. Both units have 1TB drives. One is a Lenovo Yoga 910. The other a HP Spectre x360. I am learning that simply re-writing 1’s and 0’s isn’t the go-to method for SSD’s.
One of the laptops was used for small business operations. The other was personal. Like most drives, both had sensitive data written to them. I’d like to make sure I get them properly wiped to prevent data retrieval.
I booted to the BIOS on both machines and neither had a “factory” disk wipe utility that was mentioned in the article below. And it sounds like DISKPART, while free, leaves some unlikely but potential risk exposure. So I believe Parted Magic may be my best bet.
A few additional questions:
Both laptops had Win10 pre-installed, one was Pro and the other a Home license. Using the Windows restore function to “completely wipe” all data and reinstall the OS confirms there is a hidden partition with Win10 and product keys stored. Will using Parted Magic also wipe the hidden recovery partition? If so, what steps do I need to take to get those recovery keys so I don’t have to pay for another licensed product to reinstall for the future new owners?
I was reading a Reddit thread and one of the responses suggested using encryption then deleting the encryption keys and running Parted Magic would provide a more secure wipe. The thought was that by doing so even if something was retrievable from the wiping that the loss of encryption keys would prevent access. I do not recall setting up encryption when getting either laptop. And as noted in #1 above, I have ran the standard Windows restore/wipe utility. Can I still do this and would it truly offer additional protection? Is there a guide you could point me to so I get it right?
I understand a “hammer format” is likely the most secure. I’m not worried about acronym agencies getting me. I understand they have resources & technology above normal. I don’t have that sort of sensitive data to protect.
You should do a Secure Erase, this is what your #2 is referring to, as well as your linked article (note that the DiskPart “clean all” seems to take some shortcut, because a Secure Erase should take 2+ minutes to finish, and the article claims a few seconds for that command). Booting something like a Ubuntu Live image from a USB should let you follow these instructions: ATA Secure Erase - ata Wiki
As for your #1 concern, the factory windows key is baked into UEFI, when reinstalling Windows you select “I don’t have one” on the key screen, and it should retrieve it from UEFI (as well as checking with Microsoft for any available digital entitlement if you sign into a Microsoft account). It would be good if they put the UEFI check before that screen, not after.
Thank you @brwainer. I got one of the laptops wiped last night. Was a little more of a bear then I thought, mostly because I was unfamiliar with the process. Short version I had to go back to the BIOS and disable Secure Boot, and also switch Intel RST to AHCI.
Honestly I am not sure why it was defaulted to Intel RST as I don’t use RAID but as soon as I did that it worked.
It didn’t take very long in comparison to a traditional HDD. I’d say about 2 minutes or so for a 1TB drive which I thought was more than reasonable. I think I am going to use this program to verify the drive is erased, unless you have a better suggestion.
I might add for anyone silently reading along…make sure you use the Windows built-in function to make your a recoverable disc (or USB drive). I didn’t. But it seems relatively straight forward to get the software and drivers from Leonovo and make one that way.
Probably a good sign that Secure Erase worked, as that hidden recovery partition is gone. Kind of sucks w/o a recovery method though but a small hurdle overall.
I’m still not clear how to create another hidden recovery partition to replace the one I deleted so the laptop behaves the same as when I bought it. Granted, I don’t have to do this, but it is nice.
Some manufacturers provide an ISO for recovery on a new blank drive, that should set up the recovery partition as well. Just have to look through the utilities listed for that model.
If not, you won’t be able to set up the hidden partition yourself, because there are many manufacturer specific variables.
For secure look up “shred” utility, it has several option to write data and then erase footprint.
About 3 years back, I wiped a windows machine and installed Linux and when I installed Windows again (using the image downloaded from MS) it automatically retrieved the key (likely from BIOS or UEFI) and I got the full licensed OS back.
On an SSD, this is a useless waste of limited writes. The “Secure Erase” function causes the SSD to drain all cells to 0 volts, which is completely effective. There have not been documented cases of recovering data from an SSD that has been Secure Erased, unlike reading the leftover magnetic traces from, for example, writing all 1’s or all 0’s once to an HDD.
I’m not an expert on hardware but you are correct the “shred” utility that I used was on a spinning disk and worked like a charm. Good to know that SSD are more convenient when it comes to erasing disks!
Is there a way to provide a “secure erase” on USB flash drives? I was forced to download the OS + drivers for both laptops and going to include for the future owner. One of the thumb drives is new. The other came with one of the laptops and I was just going to reuse but it had personal files on it for a stint of time. I’d like to securely erase before putting the OS recovery files.
My understanding is “secure erase” as discussed for SSD’s doesn’t work on USB flash drives. For the relatively low cost I can just destroy it. It’s a 64gb drive. I bought a pack of 5 drives (32gb) for less than $20. Looking for a FREE solution.
Flash drives are tricky. Architecturally, they are the same as an SSD - block 0 that the computer sees may not be stored in block 0 of the media, due to load balancing and the write characteristics. That’s another reason why you need to use the Secure Erase function of an SSD - the actual media volume might be several GBs larger than the usable capacity. Flash drives and SD cards are the same, but without the AHCI protocol and the Secure Erase functionality.
For casual protection, a single pass from any tool used to wipe HDDs is sufficient. But if you wanted to be sure that even advanced forensic retrieval fails, I believe destruction is the only option - and you have to be sure to destroy every NAND cell, not just the PCB.
Thank you for the additional information, it is very useful. Given the fact this had some business data on it and cost factor is negligible, I just decided to err on the side of caution and install the OS + drivers on a new drive.
This will allow me to continue using the 64gb drive for my own purposes and once it’s time to retire the drive I will just physically destroy it. We have one of those fancy pants cross-cut shredders – am I correct to assume that will provide the proper death for non-retrieval should the spooks try to get me, lol.
A big shout out to @brwainer for the kindness, guidance & help extended to me during this process. Much appreciated buddy.
As I close out this post I wanted to provide a few tidbits of info that I hope will be able to help someone in the future should they stumble onto this post. That said, here we go:
Best I can tell, the ATA Secure Erase method is a FREE way to do what Parted Magic does. Both use a bootable Linux environment so you can deploy similar commands. The difference is the ATA method requires CLI and Parted Magic offers a GUI. Also PM offers some additional functionality/programs that users may find useful.
Cost for Parted Magic is minimal. For $13, you can get the software and some short term duration software updates.
A few different programs can be used for making the bootable disc. I initially used Etcher for Mac. It worked fine in boot mode for the target PC’s but I couldn’t ever get it to mount inside Mac OS using GUI or CLI methods.
I opted to use Disk Verifier to confirm the drives were securely erased. It was only $7 or so and I got the version that works in conjunction with Parted Magic, as opposed to the stand alone Live version. If you choose the ATA secure erase method, you’d need the Live version instead.
Because of #4, I found #3 to be more frustrating. To get Disk Verifier setup properly, you have to drop a file inside the Parted Magic ISO file. Not really a big ordeal EXCEPT when it won’t mount that can’t happen. Even as a work around I downloaded a free trial of Parallels and ran VM’s of Ubuntu and Win 11 – with the same results as Mac OS. Eventually I stumbled onto the blog the developer of Disk Verifier had produced (for Mac, PC and Linux FYI, kudos!). He opted and recommended using Unetbootin instead (free for Mac, PC and Linux ). I tried and this fixed my problem – booted the target PC’s and also mounted back in native Mac OS as well as my Ubuntu and Win11 VM’s.
Both target laptops have 4k touch screens, one a 13" and the other a 15". When using the bootable USB stick to load PM it is near impossible to see the boot options. Even after Linux loads, things are so tiny it’s a major strain. Luckily, they have a Display icon on the main screen and with some squinting I was able to change my resolution to something that a normal human can see.
I had issues getting both laptops to run Secure Erase. On the Lenovo it loaded into the Linux kernel okay and even run some of the other programs (there was one to identify the embedded Windows key FYI). It just wouldn’t allow Secure Erase. I figured out I had to adjust the BIOS to use AHCI controller in lieu of Intel RST. At one point I thought toggling off the secure boot option was also a trigger, but later I confirmed it mattered not. The controller was the secret. On the HP, I had a different error. It kept having a kernel panic during the load screen and wouldn’t ever actually load. As I mentioned earlier, there are about half a dozen options – all in tiny micro print. II fat fingered the option I wanted but it worked out great as my text automatically increased in size and it opened up the Linux OS. I quickly ran the Secure Erase program and it worked the first time.
Although Secure Erase just took a couple of minutes to run, Disk Verifier took a good 30-45 minutes per laptop. Once done running you can view the logs but if you want to reference them later you have to SAVE them by pointing to a directory. I created a folder at the root level called logs and was able to retrieve them after I exited and mounted the ISO back to my Mac/Win/Linux desktop.
Initially I goofed up and didn’t create a recovery USB (inside Windows) prior to running the Secure Erase program on the Lenovo. Once Secure Erase is ran it kills everything, including that secret recovery partition so if you don’t have a disc or bootable USB you are out of luck. My original nifty plan was to use the HP to run Lenovo’s program to obtain the original OS + drivers. Before doing so I wanted to update the HP and then make a recovery USB drive so I didn’t end up with 2 laptops in this state. The updates to Win10 Pro went as planned and I proceeded to start making my recovery drive. When I came back to check on things I also noticed that Win11 had downloaded and was trying to install at the same time. It was actually waiting on me to reboot the computer to finish the install. Oh yeah, and the recovery USB drive was complete. Ugh, I figured the drive was corrupted but there wasn’t much I could do at this point. I unmounted the USB drive and rebooted the HP. The good news is Win11 loaded fine. Feeling a bit cocky, I figured I’d throw the USB drive in and see what happened. Figured I’d have an option to back out. Nope, I was wrong and the USB recovery drive failed shortly after it started. Now both target laptops were unable to boot into Windows and at this point I had no OS + drivers to install on either machine. Hopefully my pain & sharing the embarrassment saves someone else their own pain & frustration.
While I had access to several Macs, the only other PC I had access to was my work laptop which is locked down so tight you’d think I work for an alphabet soup organization. I used Parallels years and even found my (very) old license. Luckily they allow a 30 day free trial and I quickly loaded up a Win11 and Ubuntu VM. I don’t really prefer Win11 but it was just an easy click through on Parallels; otherwise, I would have chosen Win10. A quick note here, I am thankful for my Macs and also Parallels. Both just work and do as I expect. That hasn’t always been my experience with various OS, software & hardware. Enough on that, use what you want but this setup saved my bacon.
To get the OS + drivers that shipped with your Lenovo, you will need to visit this website, place an order request and download necessary files using their proprietary Windows based program (.exe file). Heads up, I required a Lenovo account to get my order submitted. I chose a digital download and there was ZERO cost. They make it sound like there is an “approval process” but mine was instantaneous. Perhaps if you order a CD there may be costs or a waiting period.
With my Lenovo I ran into a snag with the McAfee software. Essentially the recovery process failed (near the end, so got to do it 2x). There was an article that addresses the fix, which is basically to reset your date in the BIOS to 1/1/19. Easy enough. It worked fine after I did as suggested.
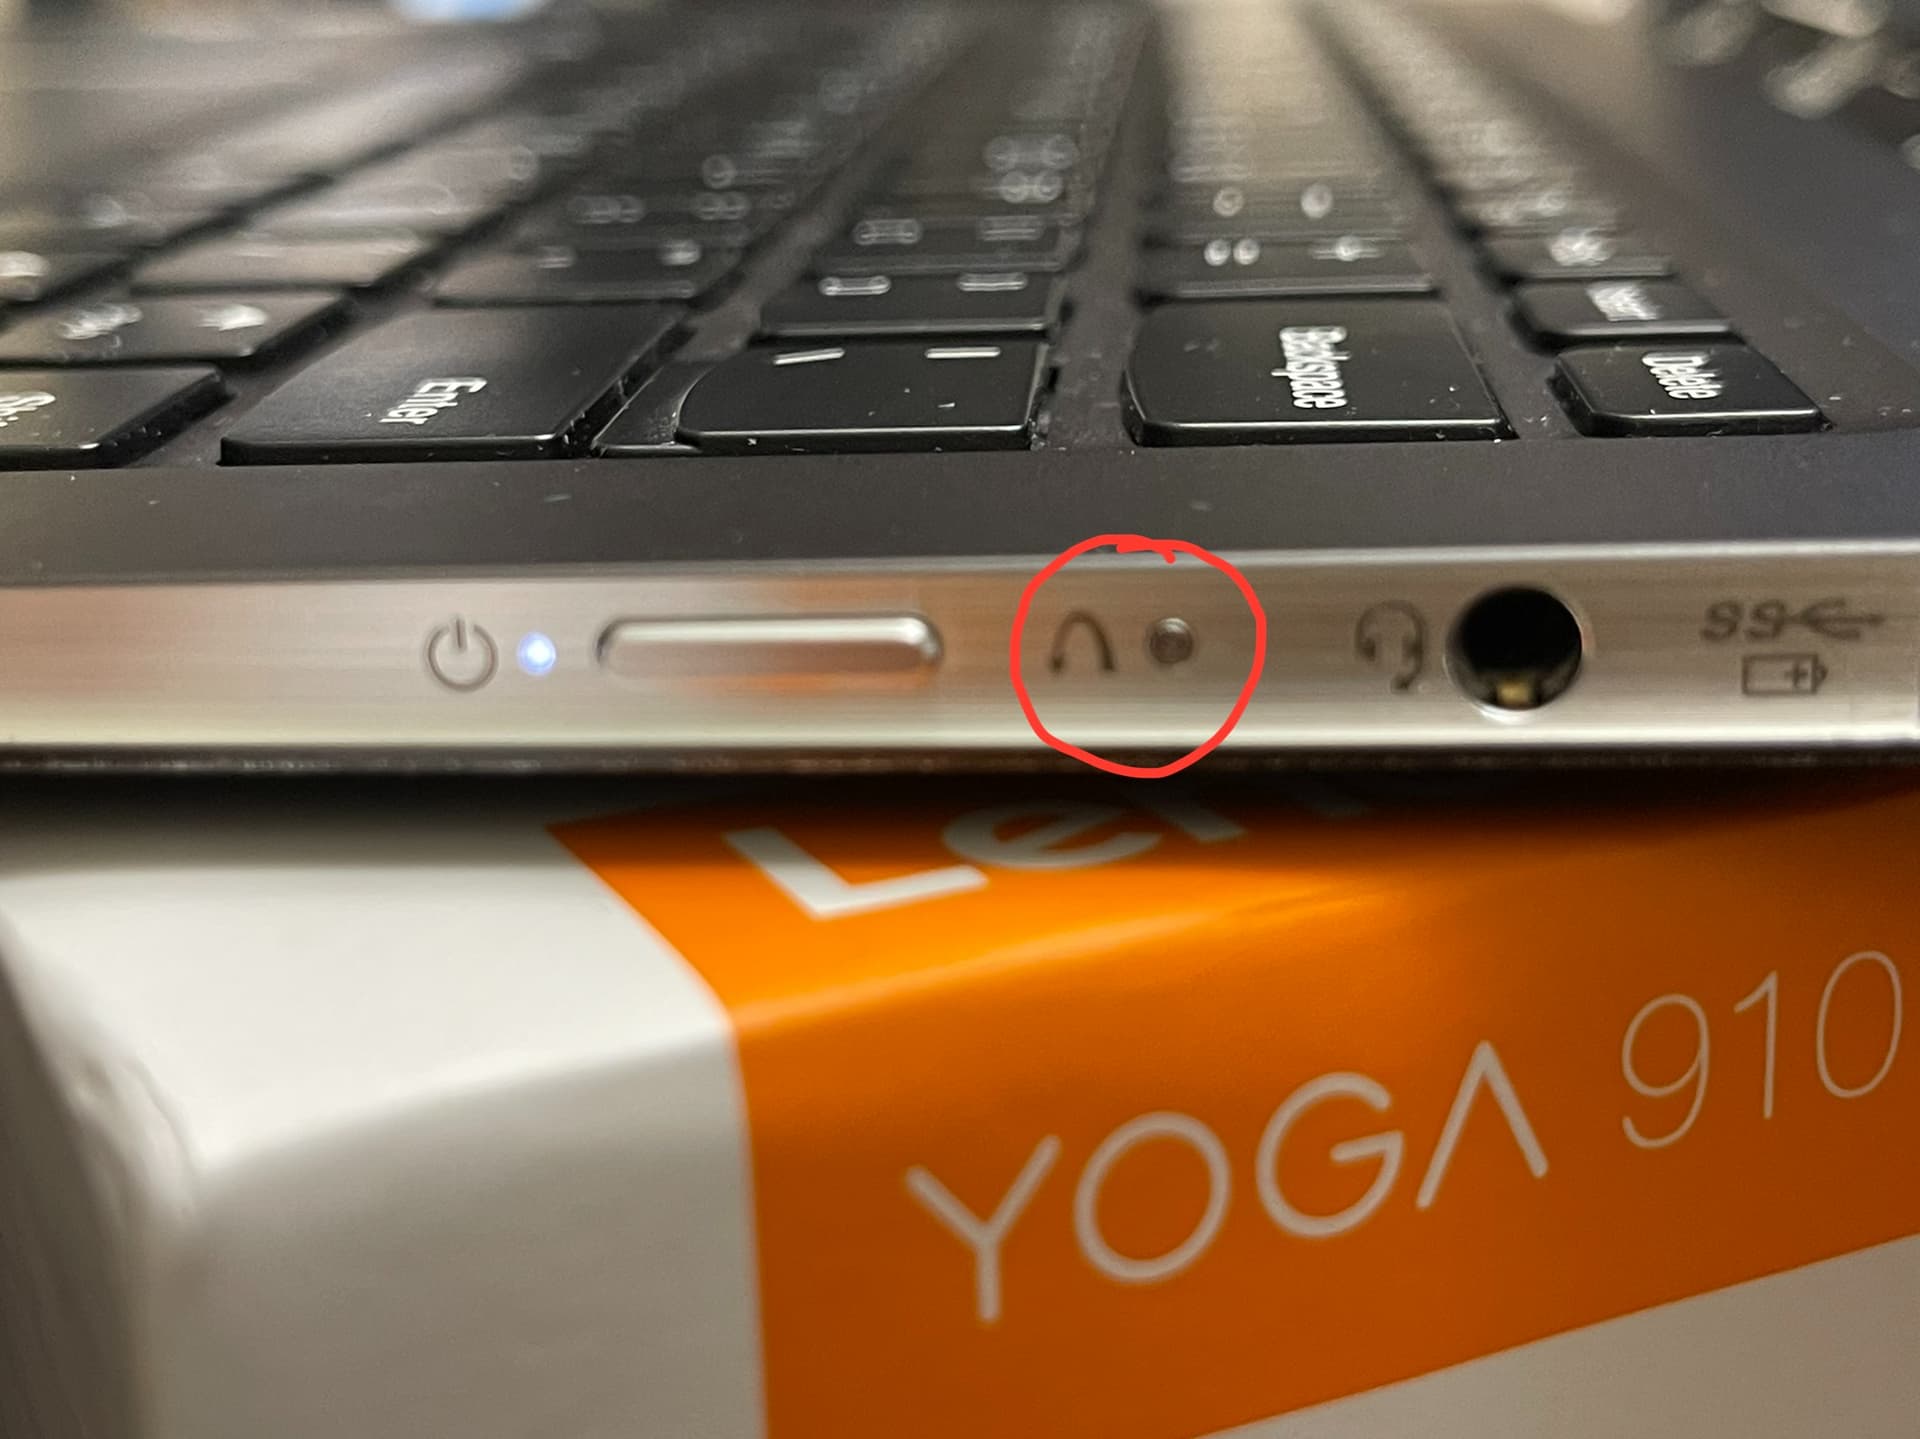
Entering BIOS for the Yoga 910 is entered by using a toothpick, paperclip or nifty SIM card tool to push in the tiny button next to the power key. This also changes boot sequence and a few other options.
For the OS + drivers on the HP, it was more simple. Use the link below that shows you how to use their proprietary Windows based recovery tool to download and make a bootable USB drive. No registration required but you are required to enter the serial number of the device.
After both targets were secure erased, verified and the factory OS + drivers were restored I then updated Win10 to the latest & greatest on both targets using the built in Windows update function. I was extra careful this time to ensure that Win11 didn’t get downloaded or installed this go round. Doing this was a little painful for me because of the time duration but after it was updated I then used the Reset PC function inside Windows so that the new owner(s) will get a fresh out-of-the-box experience by setting up their region, username, wifi, etc. And the Reset PC function keeps all the updates so it’s a little easier on them from that aspect.
In my case, both the target laptops were eligible for Win11 upgrades but I wanted to give the new owner(s) the option to make that leap. Most things are probably obvious to more savvy users but TPM may throw some folks so I am leaving a link on how to check that too. Towards the bottom of the compatibility list there is a list of things you surrender from Win10. Not sure how many people look at that, but they should.