OK, so I have figureed it out… Reading around about decryption commands like geli attach I quickly discoved this is a “no no” in the FreeNAS world and I was encouraged to use the built in API commands to unlock the volume rather than command line instructions.
So, using the API means creating a python script which would contain:
- Root user ID
- Root user password
- Base64 encoded version of the recovery key for the volume
Now, of course we don’t want to store this recovery key on the FreeNAS server itself, that should be stored on the Pi. For added security, it would be good to store it on the Pi, but so that it is itself encrypted at rest. For this we will create a LUKS encrypted file and then decrypt/mount this when necessary in order to obtain the keys for the FreeNAS volumes.
So first, let’s set some stuff up on the Pi
apt update
apt upgrade
apt install cryptsetup
# Create a 128Mb file containing random data, this will be the file we will encrypt and use to store the keys.
# This file is way bigger than required, but hey, we might use it for something else later
dd if=/dev/urandom of=~/secure.luks bs=1M count=128

# Set this file to be an encrypted LUKS container
# We will be asked for a passphrase for the encryption. Let's make it long and complicated and we'll use it later to decrypt this volume from FreeNAS
cryptsetup -y luksFormat ~/secure.luks

# Let's open our encrypted volume and so we can access it as a device within /dev/mapper
# We'll need to use our passphrase to open the file
sudo cryptsetup luksOpen ~/secure.luks secure

# Now we can create a filesystem within the device
sudo mkfs.ext4 -j /dev/mapper/secure

# Create somewhere to mount this filesystem in future
sudo mkdir /mnt/secure

# At last, we can mount our encrpyted file system
sudo mount /dev/mapper/secure /mnt/secure
Once this is done, you should copy your recovery keys to the /mnt/secure directory on the Pi. Once the recovery keys are in place, we can unmount and close the LUKS container, leaving the data secure within the Pi.
sudo umount /mnt/secure
sudo cryptsetup luksClose secure
So, at this point we have the recovery keys secured safely on the Pi, and the Pi by itself is not enough to access the recovery keys (The Pi is missing the LUKS passphrase).
Now let’s setup some stuff on the FreeNAS box
First, lets set-up an area on FreeNAS to store all of our goodies…
mkdir /root/auto-mount
Ultimately, we will be creating a RAMdisk (/mnt/ramfs) and copying the recovery keys from the Pi to this ramdisk. My pools and recovery keys are as follows (you see this list later, so I figured I would explain it at this point…
Pool           Recovery key
vol_3x3        3x3-r.key
vol_4x2        4x2-r.key
1 ) We need to setup password-less ssh access to the Pi, we’ll do this using ssh keys
# Run ssh-keygen to create the default ~/.ssh/id_rsa ssh key (no passphrase)
ssh-keygen

# Add the public key of this ssh key to the authorized keys of the PI
# We will be prompted to enter the password of the Pi use in order to access the Pi on this occasion, but once the keys are installed on the Pi we won't need to use the password again
cat ~/.ssh/id_rsa.pub | ssh pi@<PI-IP-ADDRESS> 'mkdir -p ~/.ssh && cat >> ~/.ssh/authorized_keys'

# Check that password-less access is working by running
ssh pi@<PI-IP-ADDRESS>
# You should be dumped straight to the terminal of the Pi without being prompted for a password. You can now logout of the Pi using:
exit
2) Create some scripts to mount and unmount the secure area on the Pi from FreeNAS
These scripts need to be written in a way that will work as if you are typing the command on the Pi. Later we will use SSH to execute these commands on the Pi itself.
/root/auto-mount/pi-mount-secure.sh
#!/bin/bash
echo -n "LUKS-PASSPHRASE" | sudo cryptsetup luksOpen ~/secure.luks secure -d -
sudo mount /dev/mapper/secure /mnt/secure
/root/auto-mount/pi-unmount-secure.sh
#!/bin/bash
sudo umount /mnt/secure
sudo cryptsetup luksClose secure
You can see that these commands are the same as some of those we were using directly on the Pi when creating the secure container. Fortunately most of the commands we used on the Pi we one-time only commands to set everything up. For day-to-day usage, opening > mounting > unmounting > closing is a relatively simple process.
3) Create some python scripts to decrypt each volume
It might feel like we are jumping ahead at this point, because I haven’t yet explained how we’re going to key the keys on to our FreeNAS box. This will happen in an master script. But we need to create these python scripts to access the FreeNAS API first, since we’ll need to call these scripts from the master shell script.
Of course, you could combine all of this in one script, but on my system I split everything out so everything is clean and simple. You’ll see my recovery keyfiles referenced on a ramfs mount point in these scripts. You’ll also notice we need to read-in the recovery key and convert it in to a Base64 string before passing it to FreeNAS via the API
/root/auto-mount/3x3.py - I have only included one script here, but you can work out what 4x2.py would look like.
import requests
import json
import base64

recovery_key = open('/mnt/ramfs/3x3-r.key','rb')
recovery_key_binary  = recovery_key.read()
recovery_key_string  = (base64.b64encode(recovery_key_binary)).decode('ascii')

req = requests.post(
        'http://localhost/api/v1.0/storage/volume/vol_3x3/unlock/',
        auth=('root', '<FREENAS-PASSWORD>'),
        headers={'Content-Type': 'application/json'},
        verify=False,
        data=json.dumps({'recovery_key' : recovery_key_string}),
)
print (req.text)
4) Create the master auto-mount script
/root/auto-mount/auto-mount.sh
#!/bin/bash

# Create a small ramdrive to store our recovery keys temporarily
mkdir /mnt/ramfs
mdmfs -s 1m md /mnt/ramfs

# Send our unlock/mount script to the pi and execute it on the pi using ssh
ssh pi@<PI-IP-ADDRESS> 'bash -s' < /root/auto-mount/pi-mount-secure.sh

# Now the pi will have mounted the secure area, we can go and grab the two keys we need
scp pi@<PI-IP-ADDRESS>:/mnt/secure/3x3-r.key /mnt/ramfs
scp pi@<PI-IP-ADDRESS>:/mnt/secure/4x2-r.key /mnt/ramfs

# Send our unmount/lock script to the pi and execute it on the pi using ssh
ssh pi@<PI-IP-ADDRESS> 'bash -s' < /root/auto-mount/pi-unmount-secure.sh

# So, at this point our recovery keys are in RAM on FreeNAS
# and the secure area on the has been closed, so the keys are safe on the Pi

# Now we need to execure our Python scripts to use the API to unlock our volumes
/usr/local/bin/python /root/auto-mount/3x3.py
/usr/local/bin/python /root/auto-mount/4x2.py

# Now that we have unlocked the volumes, lets unmount the ramdrive
umount /mnt/ramfs

# Finally, now that the pools have been unlocked lets restart Samba
# (This is the only service I use, but you might need to restart others on your setup.)
service samba_server restart
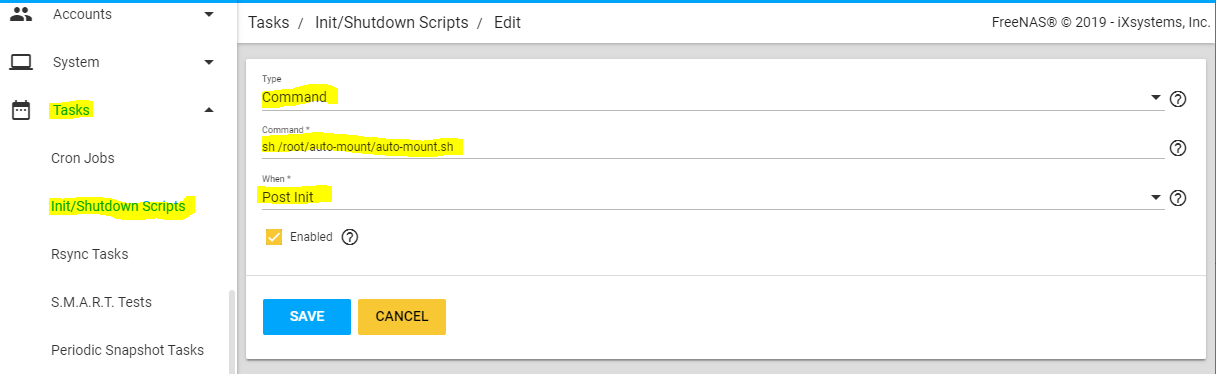
5) Run out mount script on boot
FreeNAS > Tasks > Init/Shutdown Scripts
- Command
- sh /root/auto-mount/auto-mount.sh
- Post Init
That should do it. It seems to work for me, and I think it is secure… As long as the Pi is on the network when FreeNAS boots the volume should get unlocked. So if your FreeNAS gets stolen it won’t decrypt the drives unless they also steal the Pi.
@LTS_Tom - I had originally planned to post a bunch of reference links throughout this guide to show the background behind a lot of the things that are happening, but I received a message saying that only 2 links are allowed per post for now users… I am not sure if that is something you are aware of?