Part 1 - Installing the Debian 10 OS
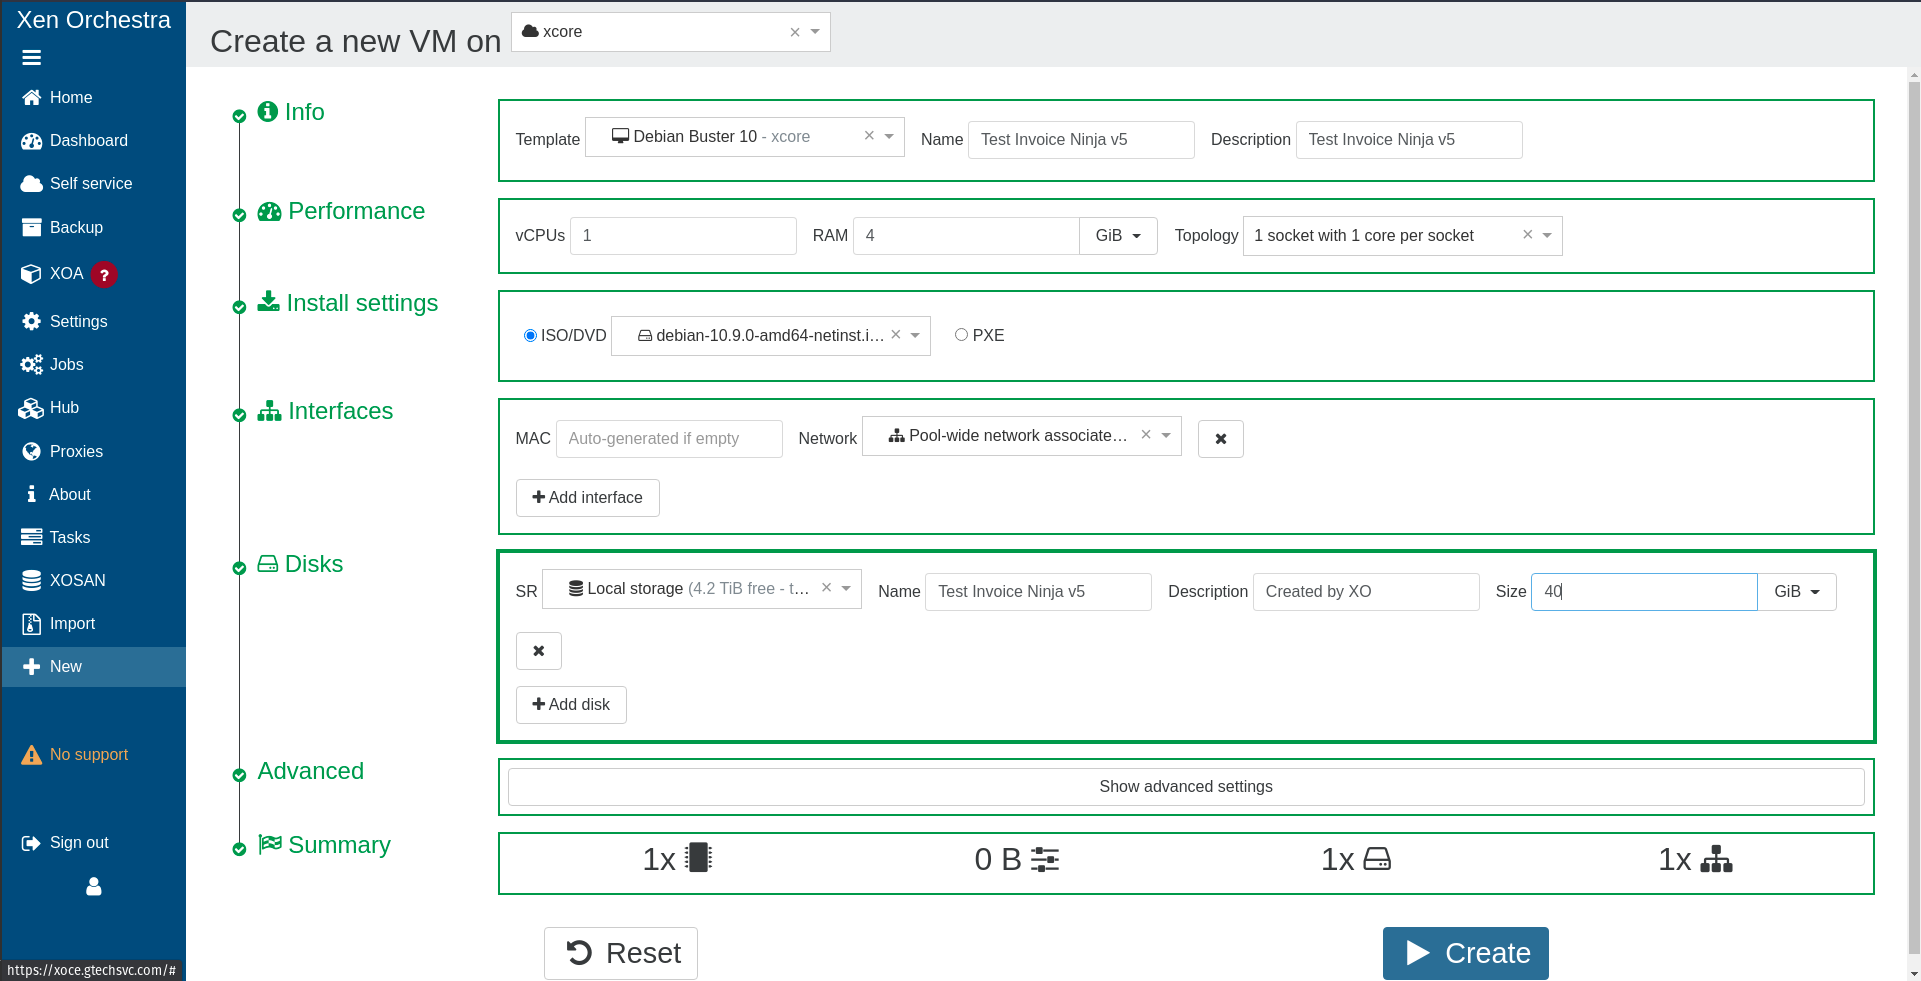
- Using XCP-ng and Xen Orchestra
- 1 CPU
- 4 GB RAM
- 1 NIC
- 40 GB HDD
OS Install
Options in order of appearance
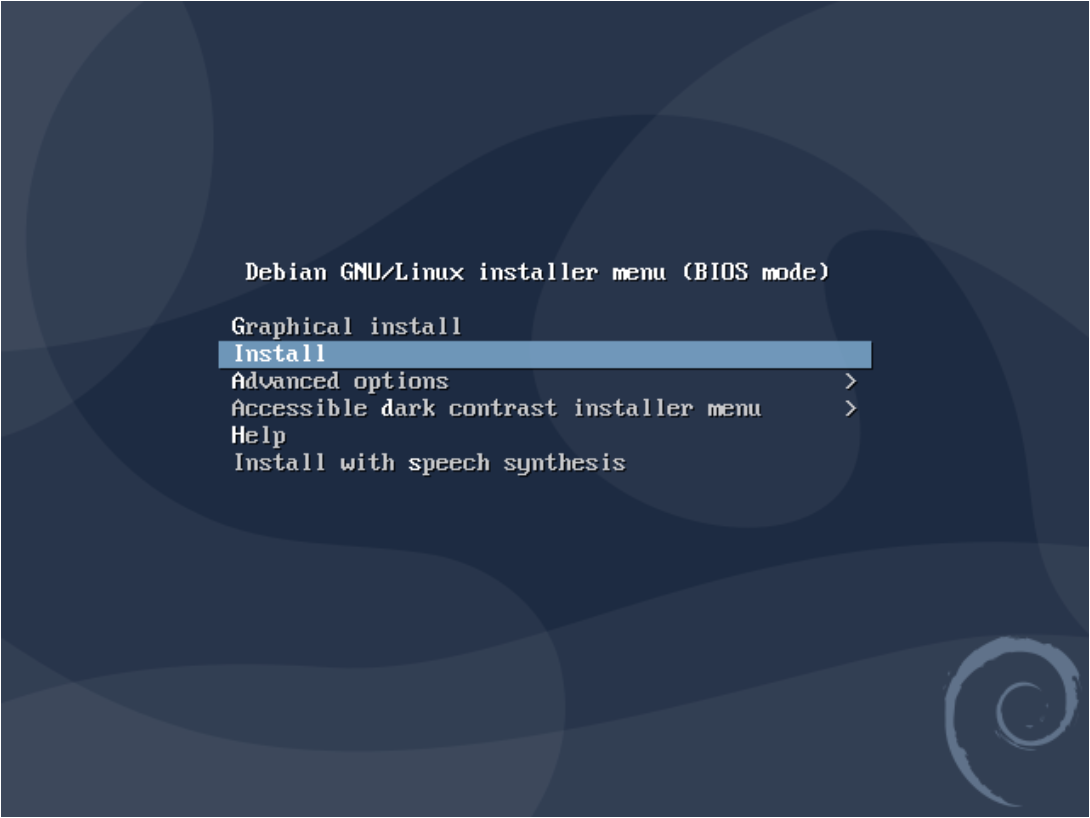
- Install
- English (default)
- United States (default)
- American English (default)
- The next two settings are critical if setting this system up for production as it will establish the FQDN. This is the foundation for setting up critical things like TLS (SSL) certificates from Let’s Encrypt and configuration during the build process. It can be changed later but it can be challenging after the fact.
- Configure the network Hostname: ninja01
- Domain name: (your domain name)
- (Optional) Root password – I skip this with continue. If you want to have root, then set the password. Skipping this will automatically install SUDO. I do this as the system will be converted into a production system and not using root is best practices for security
- Configure the clock: Eastern (default)
- Next setting is partitioning the disk. If this build will end up being used for production, strongly recommend setting up LVM (full disk encryption) at this point. It can be done later but is challenging. Because this is a demo build for me, I will not be setting this up. If you use LVM encryption, let the system wipe the partition and you will need to set a password to unlock the partition at start up or reboot
- Partition disks: Guided – use entire disk (default)
- Select disk to partition: Virtual disk 1 (xvda) – 42.9 GB Xen Virtual Block Device (default and only choice) (This is the designation used by XCP-ng and Citrix Xen Server. Bare metal install and other hypervisors will display other things like sda)
- Partition scheme: All files in one partition (recommended for new user) (default)
- Partition overview: Finish partitioning and write changes to disk (default)
- Write the changes to disk: Yes
- Installer will kick off and pull in the base packages over the internet
- Configure package manager, scan another CD or DVD: No (default)
- Debian archive mirror country: United States (default)
- Debian archive mirror: deb.debian.org (default)
- HTTP proxy information (blank for none): (blank) Continue
- Participate in the package usage survey: No (default)
- Software selection: This is critical if building a production system.
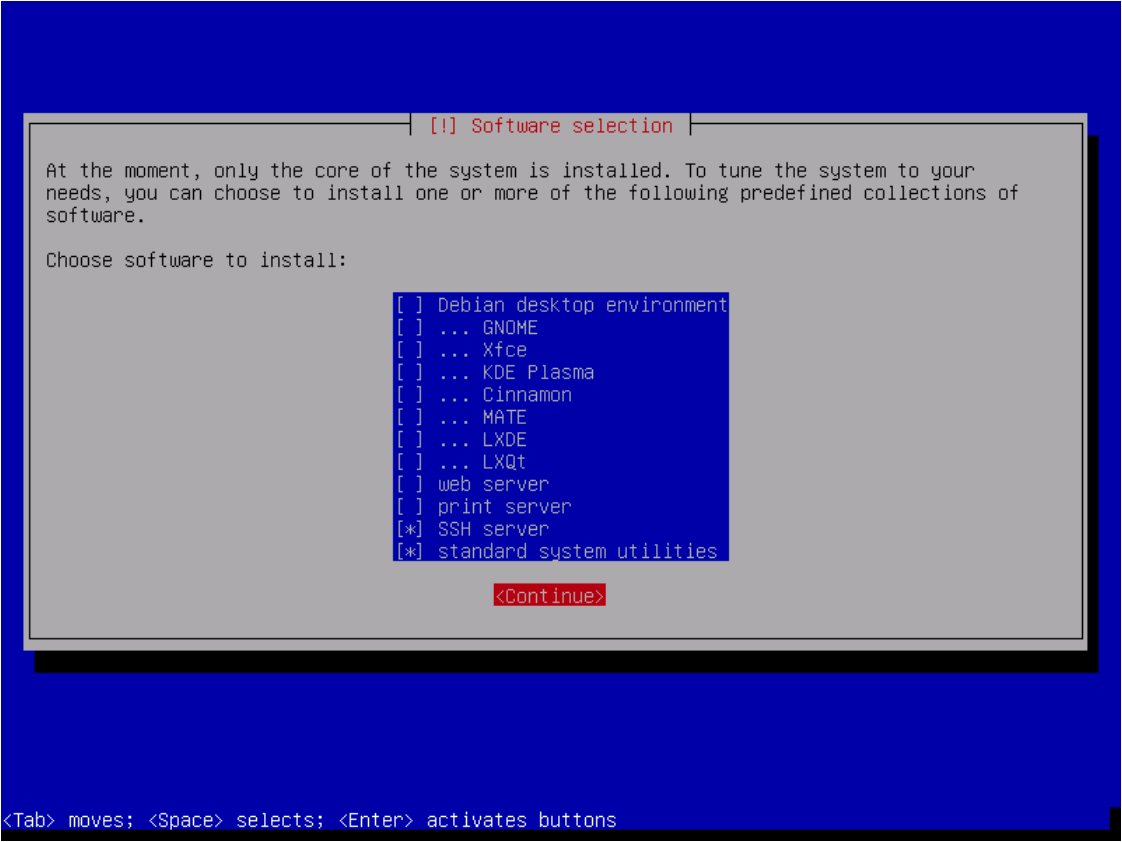
- Debian desktop environment: Uncheck (no GUI will be installed and is recommended for server installs)
- Print server: Uncheck
- SSH server: Check
- Standard system utilities: Check (default)
- Continue
- Software installation will start
- Install the GRUB boot loader to the master boot record?: Yes (default)
- Device for boot loader installation: /dev/xvda (This is the choice for XCP-ng VM. Bare metal installs or other hypervisors will list options with other names such as /dev/sda)
- GRUB boot loader will install
- Installation complete: Eject the ISO image, and select the XCP-ng guest tools ISO. After the system reboots, you will need to install the guest tools for whatever hypervisor you are using. Continue (default)
- System will reboot. If you configured LVM, you will need to enter the password to unlock the drive
Part 2 - Configuring the OS
Note: As I am not using the “root” user, all commands will be using SUDO – If you are using root, you can either remove SUDO from my commands or install SUDO to avoid editing every command.
Note: For users new to Linux, commands are case sensitive and will fail if the wrong case is used
First task is to install the hypervisor guest tools. Without these tools, the VM will not run well, it will be difficult to shutdown and reboot also. If this is a bare metal install, you can skip this part
Installing Guest Tools for VMs
-
Make sure the guest tools ISO is inserted
-
Log into the terminal
-
Commands to install the guest tools for XCP-ng are:
sudo mount /dev/cdrom /mnt
sudo bash /mnt/Linux/install.sh -
If using another distro derived from a major distro, it may be necessary to use arguments to install the guest tools.More here for installing XCP-ng Guest Tools at VM | XCP-ng documentation
-
Example installing on REHL or CentOS 8 :
sudo bash /mnt/Linux/install.sh -d rhel -m 8 -
Continue? Y
-
Unmount the CD Rom:
sudo umount /dev/cdrom
REQUIRED - Reboot the system to enable the guest tools:
sudo shutdown -r 0
- Eject the Guest Tools ISO
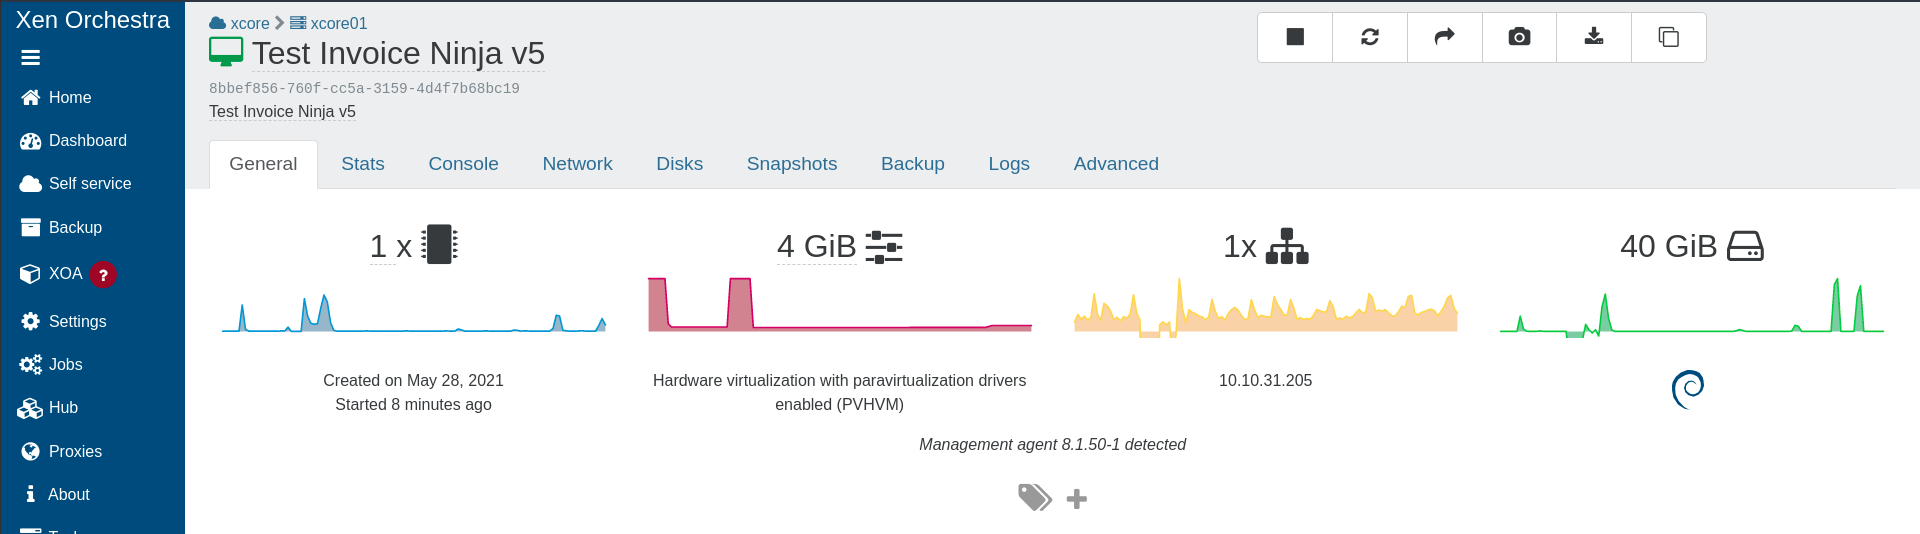
After reboot, the VM will display the version of the management engine in the General tab
Install and Configure SSH for terminal use
-
Log into the system at the terminal console
-
Update the system:
sudo apt update && sudo apt upgrade -yy && sudo apt autoremove -y -
Install SSH (if not done during installation)
sudo apt install ssh -
Enable the SSH as a service:
sudo systemctl enable ssh -
Check the SSH service to see if it is running:
sudo systemctl status sshd -
If not running, then use:
sudo systemctl start sshd -
Display the local IP address of the system:
ip a -
Access the system using SSH – Windows users can install PuTTY
-
Note: For users new to Linux, using the terminal you can copy and paste commands when using the terminal
-
(Linux Terminal) ssh (user name of the invoice ninja system)@(IP address of the invoice ninja system)
Example ssh root@192.168.3.15 -
(Optional) reboot the system to see that if the SSH service starts automatically:
sudo shutdown -r 0
then log on over ssh. If it doesn’t work, then the SSH service needs to be enabled
Installing Additional Base Packages
- These packages will help get things setup for later and adds some basic utilities
sudo apt install gnupg gnupg1 gnupg2 apt-transport-https tmux git curl wget net-tools traceroute htop unzip